CHALLENGE DAY 2
Welcome to Day 2 of the Kanban Mini-Challenge!
Today, you’ll discover:
→ A Kanban board in action + my board explained!
→ The biggest mistake to avoid when using Personal Kanban
→7 Steps to getting set up and using Personal Kanban in your daily work life
Reading time: 10-mins
Doing time: 30-mins
Action item: Create your Personal Kanban board today!
A Personal Kanban Board In Action
In the years since using Personal Kanban, I’ve become remarkably good at:
- breaking down tasks,
- prioritizing jobs I tend to procrastinate with (hello, first drafts!), and
- turning my weekly retrospective into a keystone habit that pulls the rest of my life in order.
Without this board, my life might fall apart (my productivity would definitely take a nose-dive!)
And I remember distinctly, after having my first child, that it didn’t feel like I was “back at work” until I had my board up and running again (I’d intentionally taken it down during the newborn stage).
Below you’ll find a few photos of my own board over the years (which has moved with me to five different rentals and two different states now). And I’ll elaborate on how I’ve customized it for my needs.
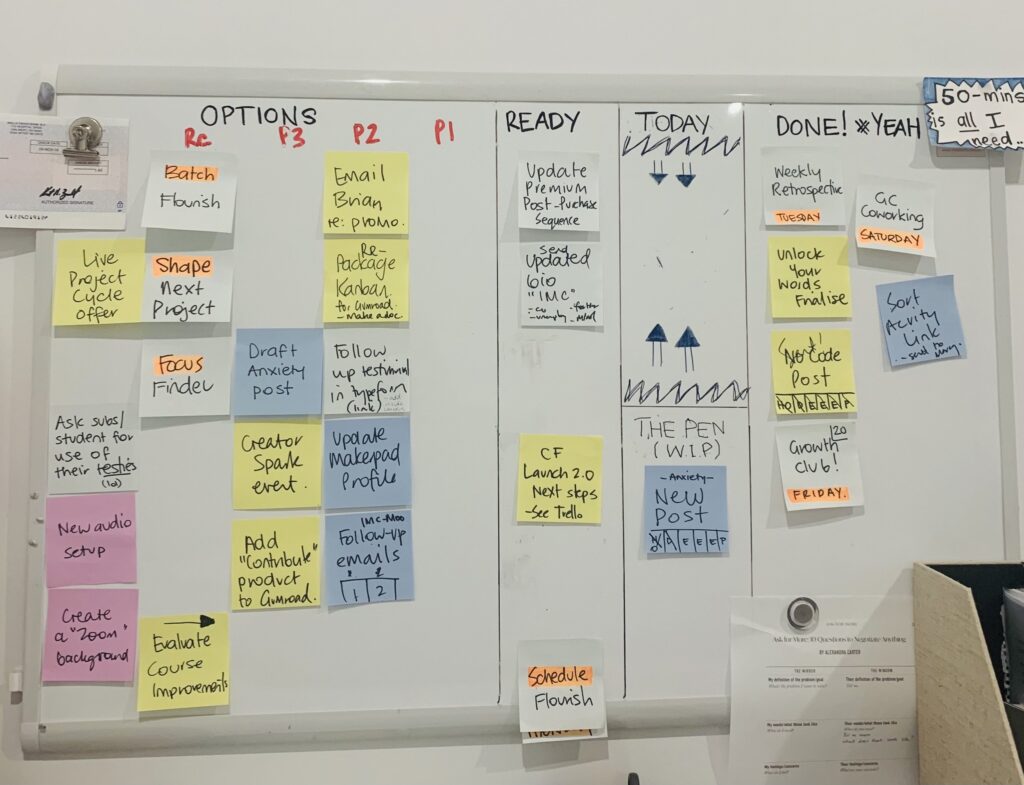
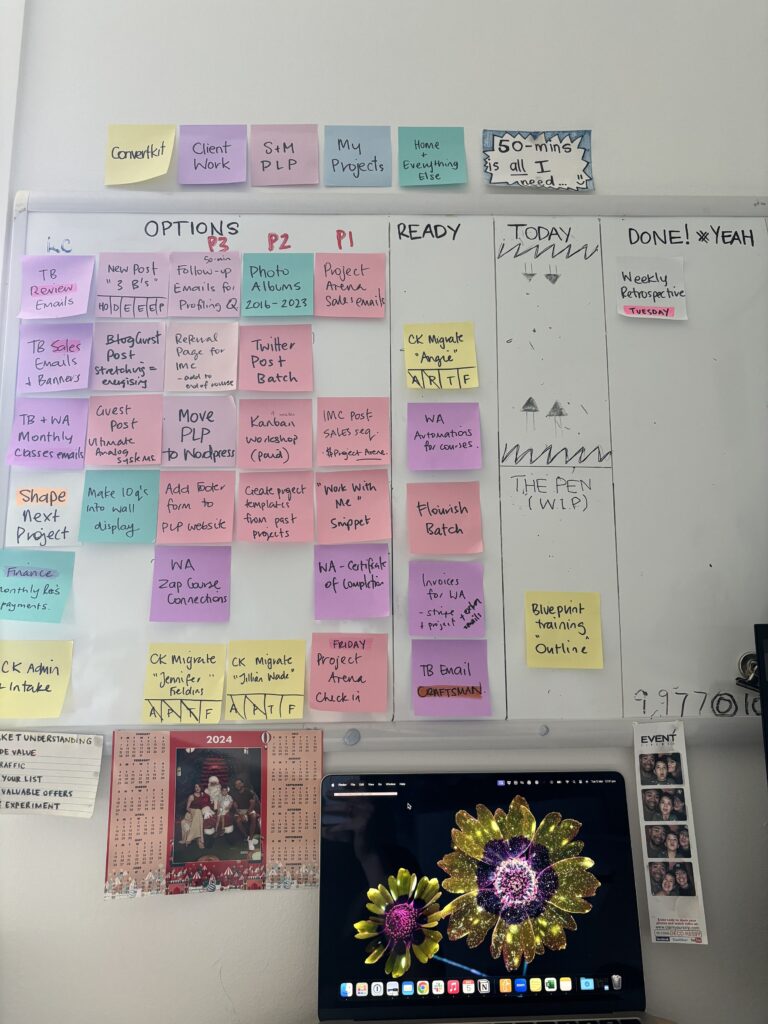
You can see the regular layout of a Kanban Board, but you may note three “advanced” steps I take with my board (though they are completely unnecessary and a personal choice):
- I use P1, P2, and P3 as Priority 1, 2, 3. This is a quick way to sort ideas in my Options column. Often, P1 is filled with tasks for the current week, but I know they happen later on in the week, so I only load up the first day or two into the READY column, when refreshing my board each week (especially if I have a lot of smaller tasks to complete.)
- RC is short for recurring. I have several recurring tasks, like writing and scheduling a newsletter, shaping a new project, and conducting a weekly retrospective. I want to avoid writing a new Post-it every time, so I make it reusable (they usually last about 6-12 months stickiness-wise) And I store it here until I get the reminder (form my calendar) to do the recurring task.
- Some tasks I break up directly on the Post-it (into checkboxes). In The Pen, you can see a ticket where I have created some boxes under the task heading. I do this mostly because I want to avoid writing out too many individual tickets (and taking up room on my board) and because I’m okay with it sitting in The Pen as I can still track progress.
I don’t recommend making any significant developments to your board within the first few months of using it.
And when you’re starting out, make every single task its own ticket.
But once you’re comfortable with using Personal Kanban and it becomes a habit — you may find ways to optimize it yourself. And I encourage you to try things out even if they don’t work and you revert back to the original.
I’ve been using mine for 8 years. And it’s still essentially the same!
Beware! DO NOT make your Personal Kanban board digital
You might think setting up your favorite to-do app in Kanban style is easier.
But this is a mistake.
It won’t work if you have it on a computer or stuck inside a device; you can’t have it hidden from sight.
Hang it where you’ll see it—ideally, in the place where you go to do most of your work.
For me, it’s above my laptop in my home office. It’s directly in my line of sight when I walk into the room. I cannot miss it.
The intention is to “Put Success in Your Way” (h/t to Rob Hatch).
Keep your board physical and visible. It makes a huge difference.
Don’t be fooled by the lure of tech (accessibility, mostly).
For this specific arena of your life—mapping and organizing the work you commit to each day—make it impossible to ignore.
You want your board to become the focal point of your main work area.
7 Steps to Using Personal Kanban in Your Daily Work Life
Before we begin, I want you to remember the fundamental principle of Kaizen as we walk through this process:
Sustained, incremental improvement is our Holy Grail.
In other words, Kanban needs to become a habit for you. It’s the only way it works.
Using it daily is where the magic happens, and your self-management skills will explode.
Yet, as with any habit, it takes time to build.
Thankfully, the easiest habits to develop are those that are
- simple to start,
- have a powerful cue, and
- come with satisfying rewards
—which sums up Personal Kanban perfectly.
It’s also impossible to get the setup of this system wrong (perfectionists, I’m looking at you).
I repeat: you cannot get it wrong.
How well you use it will evolve, but how your board looks will stay roughly the same forever.
Prep Step: Perform your Focus Finder
Yesterday, I shared the Focus Finder exercise. If you haven’t done that, you can pause and do it now, as it will set you up for implementing the Personal Kanban system today.
A Focus Finder is an essential exercise that I do at least once a month. It brings incredible mental relief. And will help close the loop on all those tasks cramming your headspace. And help you sort through them.
You will need this list of tasks and ideas for populating your Kanban board.
(I do have another analog system I use for capturing tasks and ideas on the fly—that then gets transferred to my board later—but I’ll share more on that after the Kanban challenge is complete.
Step 2: Set up your whiteboard wall or board
You need a whiteboard, a pack of Post-it notes, and a Sharpie to create your board.
You could also use any surface covered in contact (I wouldn’t use the wall directly unless you’re okay with drawing on it…). A pinboard also works, provided you have some pins.
I’ve used all three options before. The surface doesn’t matter too much. The point is to make it big enough to easily read and move tickets (in post-it form) around without worrying about space.
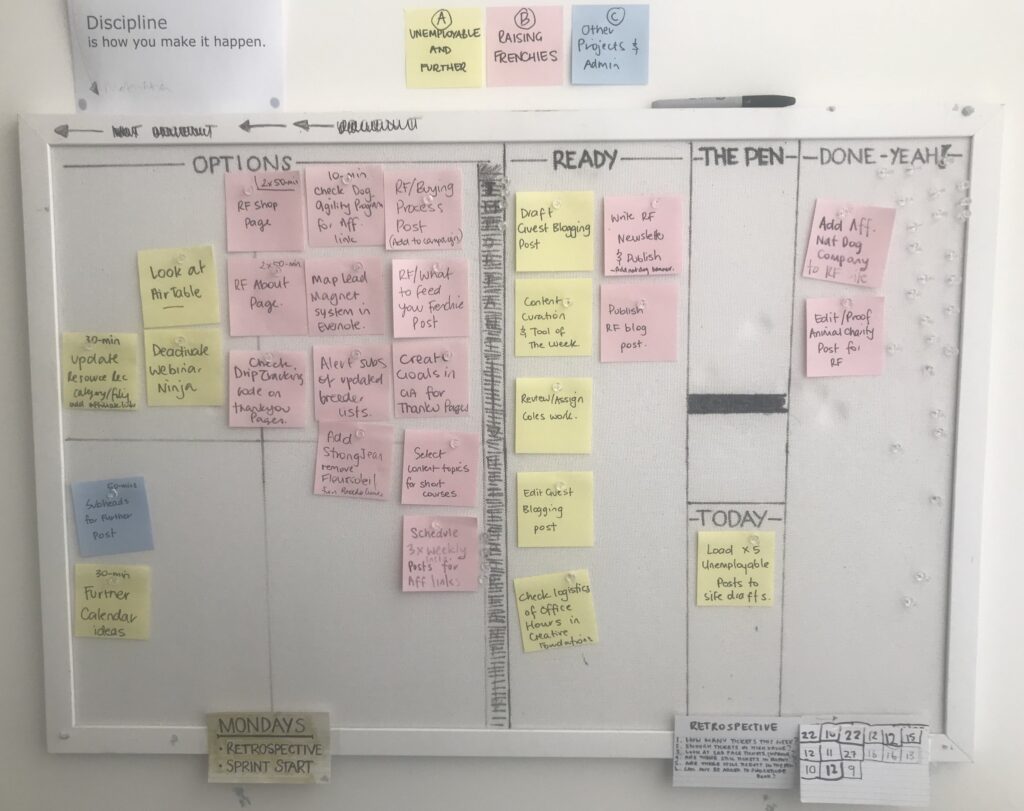
For now, take a marker and divide your board into sections as below:

To set it up, there will be four columns, and make sure you do them in approximate widths (refer to the image above).
You’ve got:
- Options (which take up roughly half your board space)
- Ready
- The Pen and Today (a split column)
- Done
Step 3: Set a timer for 10 Minutes and populate the Options column
Once you create your board, set a timer for 10 minutes and fill in the Options column.
Using your list of brainstormed tasks from your Focus Finder, write each item on an individual Post-it. Then, stick them in the largest column on your board—Options.
Remember, this is not just your work tasks; this is Personal Kanban. It’s for you, and you are the sum of all your parts. You’ve likely got work and business commitments, family commitments, health commitments, social commitments, etc.
This represents all the commitments, tasks, and ideas you want to keep track of.
Recap:
- Take 10 minutes
- Grab your Focus Finder results
- Transfer them onto Post-its
- Place the Post-its in your Options column as new tickets
Step 4: Move (no more than) six tickets into the Ready column.
Moving something from the Options to the Ready column is the pinnacle move of the Kanban process.
I populate my board based on three classifications, in this order of preference:
- Significance: how long will this matter?
- Importance: how much does this matter?
- Urgent: how soon does this matter?
High-impact tasks get done first.
They tend to energize us, and make us feel more accomplished. Leading to a delightful flow-on effect that makes us WANT to do more work! If you can, start your day with something for you (a piece of a personal or business project that moves you forward). Even if it’s just 20 minutes.
Note: Only move a maximum of six tickets to get your week started.
You don’t want to overload!
When you’re focused on less, you get more done.
Your Ready column represents the things you’ve committed to do.
They’re your signal that this is what you MUST get done. It’s that necessary reminder every time you glance at your board throughout the day that these are your intentions.
There is no redeciding later, no unnecessary distractions.
That’s the power of the Personal Kanban system. You’ll see exactly what you need to do whenever you walk into your workspace each day.
And it becomes your duty to follow through.
Two quick rules to remember
Rule #1: Whatever task you write on a ticket and pull into the Ready column, you must be able to complete it within the next week.
This means you should look at your options, pick your no. 1 priority—the most significant thing you can do—and add it to your Ready column.
Before even considering moving the next five tickets over, think about that priority task and what it will actually take to get done.
If it’s a big task, break it down. And only move the first few steps to Ready if you can see that it’s more than you can pull off this week.
Rule #2: You must know what “done” looks like.
This is crucial. When you place a ticket into the Ready column, you must understand what finished looks like.
For instance, a few tickets in my “write a new blog post” process are “draft headlines for 50 minutes”, “draft an outline,” and “draft intro for 50 minutes”.
These have clear end results. And it’s not to have a new blog post written in one sitting. Writing is a process, and I map that process out on my tickets so I can work through each step and not get overwhelmed.
For many of my writing tasks (not so much the editing but the drafting), I make sure to attach time appetites to them, too. This ensures I don’t go overboard with things like research. And makes any mentally heavy task easier to start (because I know there’s an end).
Remember, the bottleneck is always going to be you!
So it’s vital that you practice restraint when you populate your Ready column. And don’t worry, we’ll talk more about improving your ticket writing later.
Step 5: Move one ticket to the Today column
If you’ve set your Ready column up well, moving your first ticket into the Today column will be an easy move. Pick your next most significant task and tackle it.
Just make sure that whatever you commit to, you do it till it gets done.
By working on just one thing, you’ll blow yourself away with how much you accomplish over the week.
This ultra-focus is the key. Because the mental energy that flip-flopping between tasks requires is incredibly inefficient. Instead, your focus is on this one ticket while it’s sitting in that column. Only once it’s done (or your time is up), do you get to move on.
And remember, if there is a task you are likely to procrastinate with—do it first thing when you sit down to work for the day. “Leaving it till later” almost guarantees you won’t get to it at all.
As you know, procrastination often looms when a task feels too big (whether in scope or in signficance). But if you’ve dissected your tasks well, moving through your tickets from this point should be a breeze.
And rest assured, because Kanban gets you into the habit of breaking things down so they feel more doable—and more recognizable (so you become more aware of how much time, energy, and attention specific jobs take)—you’ll find your procrastination tendencies fade away with its use.
Step 5.1: Moving a ticket into The Pen
Some tasks take longer than you think. And naturally, you’ll want to take breaks and mix in other jobs while working on bigger or harder things.
Pulling tickets into The Pen is okay, as long as you know what you need to finish it.
You may also find it helpful to reimagine a task sitting in The Pen.
For example:
If you have “Send a new proposal to client” as a ticket, but you’ve only done the research side of things, edit the ticket to read “Research for new proposal” and move that ticket into Done. Then write another ticket (or two) out for “Draft proposal” and “Finalise and send a proposal.”
Edit the ticket in The Pen to reflect what you have already done. And then, add another ticket to your Read column for part two of that particular job, which can then be tackled later.
I’ve also come to use The Pen for recurring tasks (that I know take longer than a couple of hours or that I perform over numerous days, but I want to conserve post-its!)
For instance:
I used to use six Post-its for every step in my “‘write a new blog post” process. Each ticket has a specific purpose, and I work on them one by one, as separate tasks.
I call the process HODEEEP:
- Headline + Outline
- Draft
- Edit
- Edit
- Exfoliate
- Polish
Now, I use one ticket and track the progress of each stage of my writing process with checkboxes.
But when I first started using Kanban and was new to writing (and procrastinated a lot) — having them all as separate post-its worked incredibly well.
Step 6: When a ticket is finished, move it to Done
As you start to get things done, you’ll pull tickets from Today and stick them in the Done column.
Don’t underestimate this action!
It yields a tremendous sense of satisfaction. Because you’ve now got a visual scoreboard of how much you’ve accomplished. The difference this will make to your productivity, in terms of tracking what’s going on and feeling good about your wins, is astounding.
They figured this out at Toyota all those years ago (Kanban originated there); the workers like to see their progress. When you put a scoreboard in front of people, they like to beat their score. We’re wired to do it.
With your Kanban Board, you’ve got your scoreboard now in front of you. You can even note down how many tickets you get done each week (I kept that tally going for at least my first year, and it was eye-opening.)
It also gives you perspective on how up and down that number can be.
We all go through seasons of work and life, and sometimes we have endless energy and have a banger of a week. Other weeks are slower and we accomplish less. Both are fine.
The point is, you can use this knowledge to inject your days with more of what energises you, and less of what drains you. Designing (and actually living) your ideal day becomes second-nature with this kind of self-awareness.
Step 7: Pull the next ticket from the Ready column into Today
Got some more time? Great!
Pull the next ticket from the Ready column and get cracking.
Because you figured out your priorities at the start of the week, you don’t need to waste any energy deciding what to do next.
Your next task is ready and waiting to be featured in the Today column.
Here’s the thing: rather than having work pushed onto you all the time—leaving you feeling stressed—you’re pulling tickets toward you. You are in control. The psychological impact of this is colossal. Do this, and it will rock your world.
Action Item: Create your Personal Kanban board today!
This is it!
It’s your time to shine.
It’s your chance to get a new system up and running in less than 30 minutes.
- Gather your supplies
- Draw out your Kanban board
- Create your tickets and add them to Options
- Set up your Ready column for the rest of the week
- Move your first ticket into the Today column
- Execute. You can absolutely do it 🙂
Tomorrow we’re back with the final pieces of the Personal Kanban puzzle.
Day 3
You’ll discover:
→ The #1 key to success with using Personal Kanban
→ Retrospectives: How to focus and move forward — every week!
→ How to troubleshoot your task-management + travelling with Personal Kanban
→ Battling what if’s, setting boundaries, and what’s next with your self-management overhaul!